From Scratch: Turning Neovim into a Defold IDE

I’ve been a very happy Neovim user for a while, and I’m also a huge fan of the Defold engine. Both of these have quite some things in common as they’re both lightweight, fast and stay out of your way. Either represents to me something where the tool you use, empowers you to do the thing you want to do without adding unnecessary friction.
Combining these two used to be quite a challenge. You needed to setup the LSP with special annotations, opening Neovim from Defold as an external editor is a pain due to it being a terminal program, and debugging was often annoying. This is also why I made defold.nvim, a Neovim plugin that automatically does all the configuration for you.
Now that the Defold preferences API (Defold 1.12.1) has been merged,
which we use to automatically setup the external editor behavior from within defold.nvim and Neovim 0.12 is out with
the new standard package manager vim.pack, I thought it was time to write an article explaining how to set everything
up from scratch. We’re going to create a whole new Neovim configuration and turn it into the perfect Defold IDE.
Pro-Tip: Isolated Testing with NVIM_APPNAME
Before we start: if you already have a working Neovim configuration and want to try this out without breaking your
existing setup, there is a surprisingly little-known Neovim feature that allows you to run multiple configurations in
parallel: the NVIM_APPNAME environment variable.
To launch Neovim with a completely isolated configuration, you can simply run:
$ NVIM_APPNAME=nvim-defold nvimNeovim will not look for its configuration in ~/.config/nvim-defold (Windows: %LOCALAPPDATA%/nvim-defold) instead
of the default directory, the perfect playground for our new setup :).
Note: Your configuration might be somewhere else, you can confirm your configuration location by calling the
:echo stdpath("config") command in Neovim.
I’ll from now on use the path ~/.config/nvim in explanations, if you’re using NVIM_APPNAME please replace the path
accordingly.
Bootstrapping with vim.pack
First, lets create an init.lua file in ~/.config/nvim/init.lua
-- first lets set up line numbers
vim.o.number = true
vim.o.relativenumber = true -- and relative line numbers too

-- (optional) enable autocomplete
vim.o.autocomplete = true

-- some completion options
vim.opt.completeopt = {
    "menuone",  -- display the completion menu even if there is only one item available
    "noselect", -- don't auto select an item
    "popup",    -- show popup with extra informations
}

-- next lets install some plugins
-- in vim.pack plugins are added using `vim.pack.add` and you specify the full repository url
vim.pack.add {
    -- we will start by adding a theme, in this case catppuccin, which you might have noticed by the
    -- colors on this page, I'm quite fond of.
    "https://github.com/catppuccin/nvim",

    -- the official LSP (Language Server Protocol) configurations, this isn't really required anymore to make LSP work,
    -- because LSP is now part of Neovim but it contains configs for the language servers so I'd install it regardless
    "https://github.com/neovim/nvim-lspconfig",

    -- mason is a plugin for managing LSPs, I personally don't use this one and prefer installing the LSPs on my system
    -- myself, but for this post we are making our lives a bit easier by using mason
    "https://github.com/mason-org/mason.nvim",

    -- and lastly we want `defold.nvim`
    "https://github.com/atomicptr/defold.nvim",
}
If you now start Neovim it should prompt you with:
These plugins will be installed:
defold.nvim from https://github.com/atomicptr/defold.nvim mason.nvim from https://github.com/mason-org/mason.nvim nvim from https://github.com/catppuccin/nvim nvim-lspconfig from https://github.com/neovim/nvim-lspconfig
Proceed? [Y]es, (N)o, (A)lways:
Confirm, and install the plugins.
Next we’re gonna setup the theme and mason:
-- ...
vim.pack.add {
-- ...
}
-- setup catppuccin plugin with the `mocha` flavour
require("catppuccin").setup {
flavour = "mocha",
}
-- and apply the theme
vim.cmd.colorscheme "catppuccin"
-- setup mason
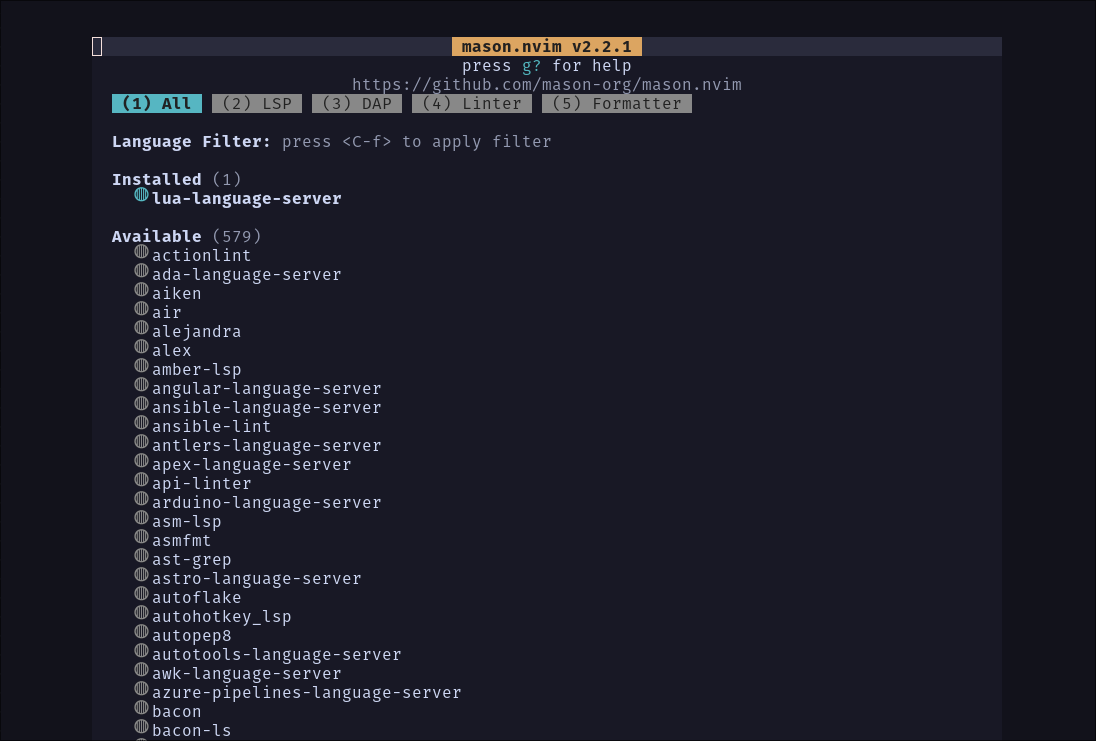
require("mason").setup {}Next, restart Neovim (or use the new :restart) and use :MasonInstall lua-language-server, if you set it up correctly
if you open up mason using :Mason it should show this:
Next lets head back to the config and enable the LSP:
-- ...
require("mason").setup {}

-- enable the lua language server, this config comes from nvim-lspconfig
vim.lsp.enable "lua_ls"

-- next we set up the auto completion to trigger
vim.lsp.config("lua_ls", {
    on_attach = function(client, bufnr)
        vim.lsp.completion.enable(true, client.id, bufnr, {
            autotrigger = true,
        })
    end,
})
If you now open a lua file, you can see the LSP autocomplete working in action:
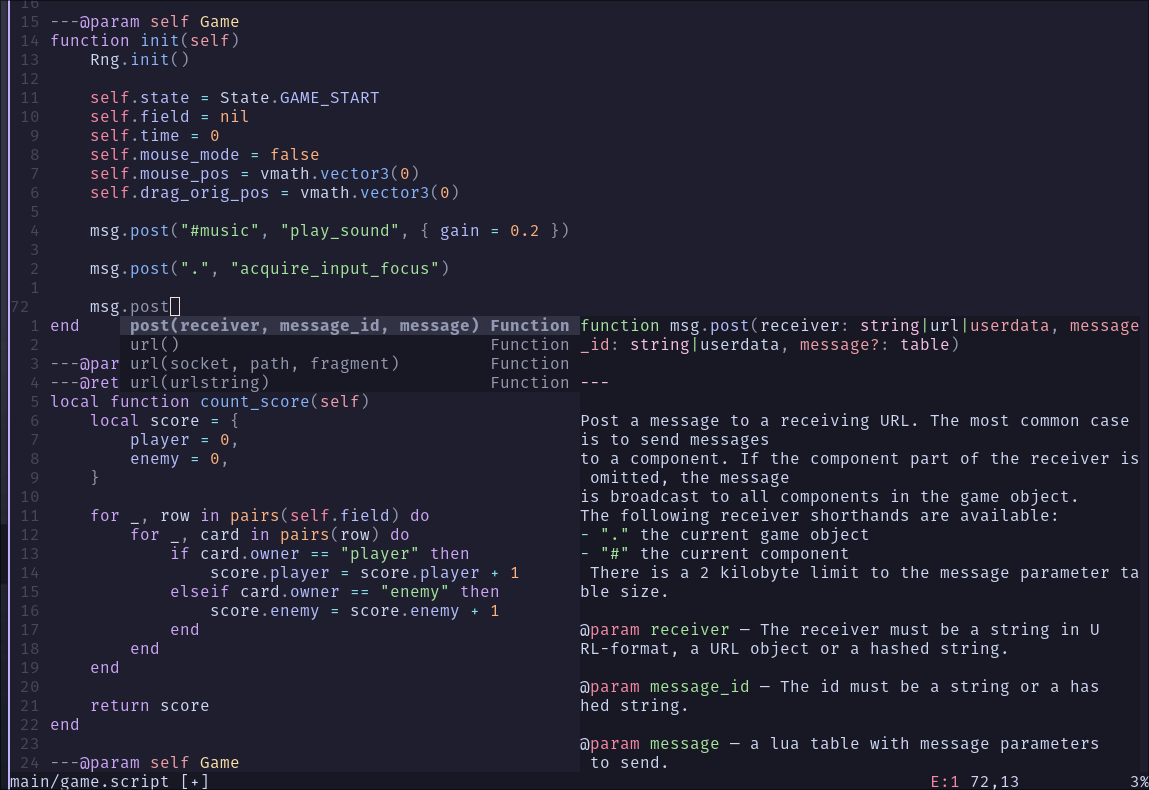
And with that our basic editor is set up in just ~30 lines of Lua config.
Assuming the editor is running and you are in a correct project with Neovim, you can now hit ctrl+b or just
:DefoldSend build to run the game.
Setup Debugging
In order to debug using Neovim we first need to install mfussenegger/nvim-dap, we’re also going to use igorlfs/nvim-dap-view as our debug view.
So first lets add both of these to our dependencies:
-- ...

vim.pack.add {
    "https://github.com/catppuccin/nvim",
    "https://github.com/neovim/nvim-lspconfig",

    -- we add these two lines here
    "https://github.com/mfussenegger/nvim-dap",
    "https://github.com/igorlfs/nvim-dap-view",

    "https://github.com/mason-org/mason.nvim",
    "https://github.com/atomicptr/defold.nvim",
}

-- ...
and append this to the config as well:
-- from beore
vim.lsp.enable "lua_ls"
vim.lsp.config("lua_ls", {
    -- ...
})

local dap = require "dap"
local dap_view = require "dap-view"

-- we tell nvim-dap to open the view when the `attach` and `launch` events are fired
dap.listeners.before.attach.open_dap_view = dap_view.open
dap.listeners.before.launch.open_dap_view = dap_view.open

-- since we also want to somehow interact with the debugger easily, we are going to add some keybinds
vim.keymap.set("n", "<F9>", "<cmd>lua require('dap').toggle_breakpoint()<CR>", { desc = "DAP: Toggle Breakpoint" })
vim.keymap.set("n", "<F1>", "<cmd>lua require('dap').continue()<CR>", { desc = "DAP: Continue" })
vim.keymap.set("n", "<F2>", "<cmd>lua require('dap').step_into()<CR>", { desc = "DAP: Step Into" })
vim.keymap.set("n", "<F3>", "<cmd>lua require('dap').step_out()<CR>", { desc = "DAP: Step Out" })
vim.keymap.set("n", "<F4>", "<cmd>lua require('dap').step_over()<CR>", { desc = "DAP: Step Over" })
vim.keymap.set("n", "<F5>", "<cmd>lua require('dap').step_back()<CR>", { desc = "DAP: Step Back" })
Take some time to look at the keybinds, the most important parts right now are: We use F9 to set breakpoints and F1 to continue.
Next restart Neovim and install the new plugins as before.
Defold Project Configuration
Neovim is now set up properly, we still need to do some setup in our Defold project. We will be using the mobdebug Lua debugger, I made a small Defold plugin for this called defold-mobdebug
First, open your game.project file and add the following line to your dependencies in the project section:
https://github.com/atomicptr/defold-mobdebug/archive/refs/heads/master.zipNext, select Project ▸ Fetch Libraries to fetch & update your libraries.
Now in your primary collection (usually main/main.collection), right click the collection and hit Add Game Object File

Next, select the debugger.go

And lastly enable (and perhaps change the port of) the debugger
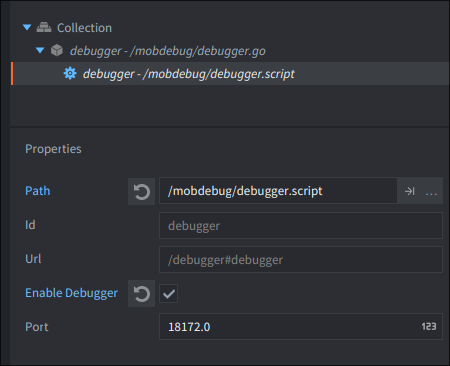
Note: You can not use the MobDebug default port 8172, because the Defold editor itself uses that for the builtin debugger and should you change it, don’t forget to adjust the setting in the defold.nvim plugin settings
Using the Debugger
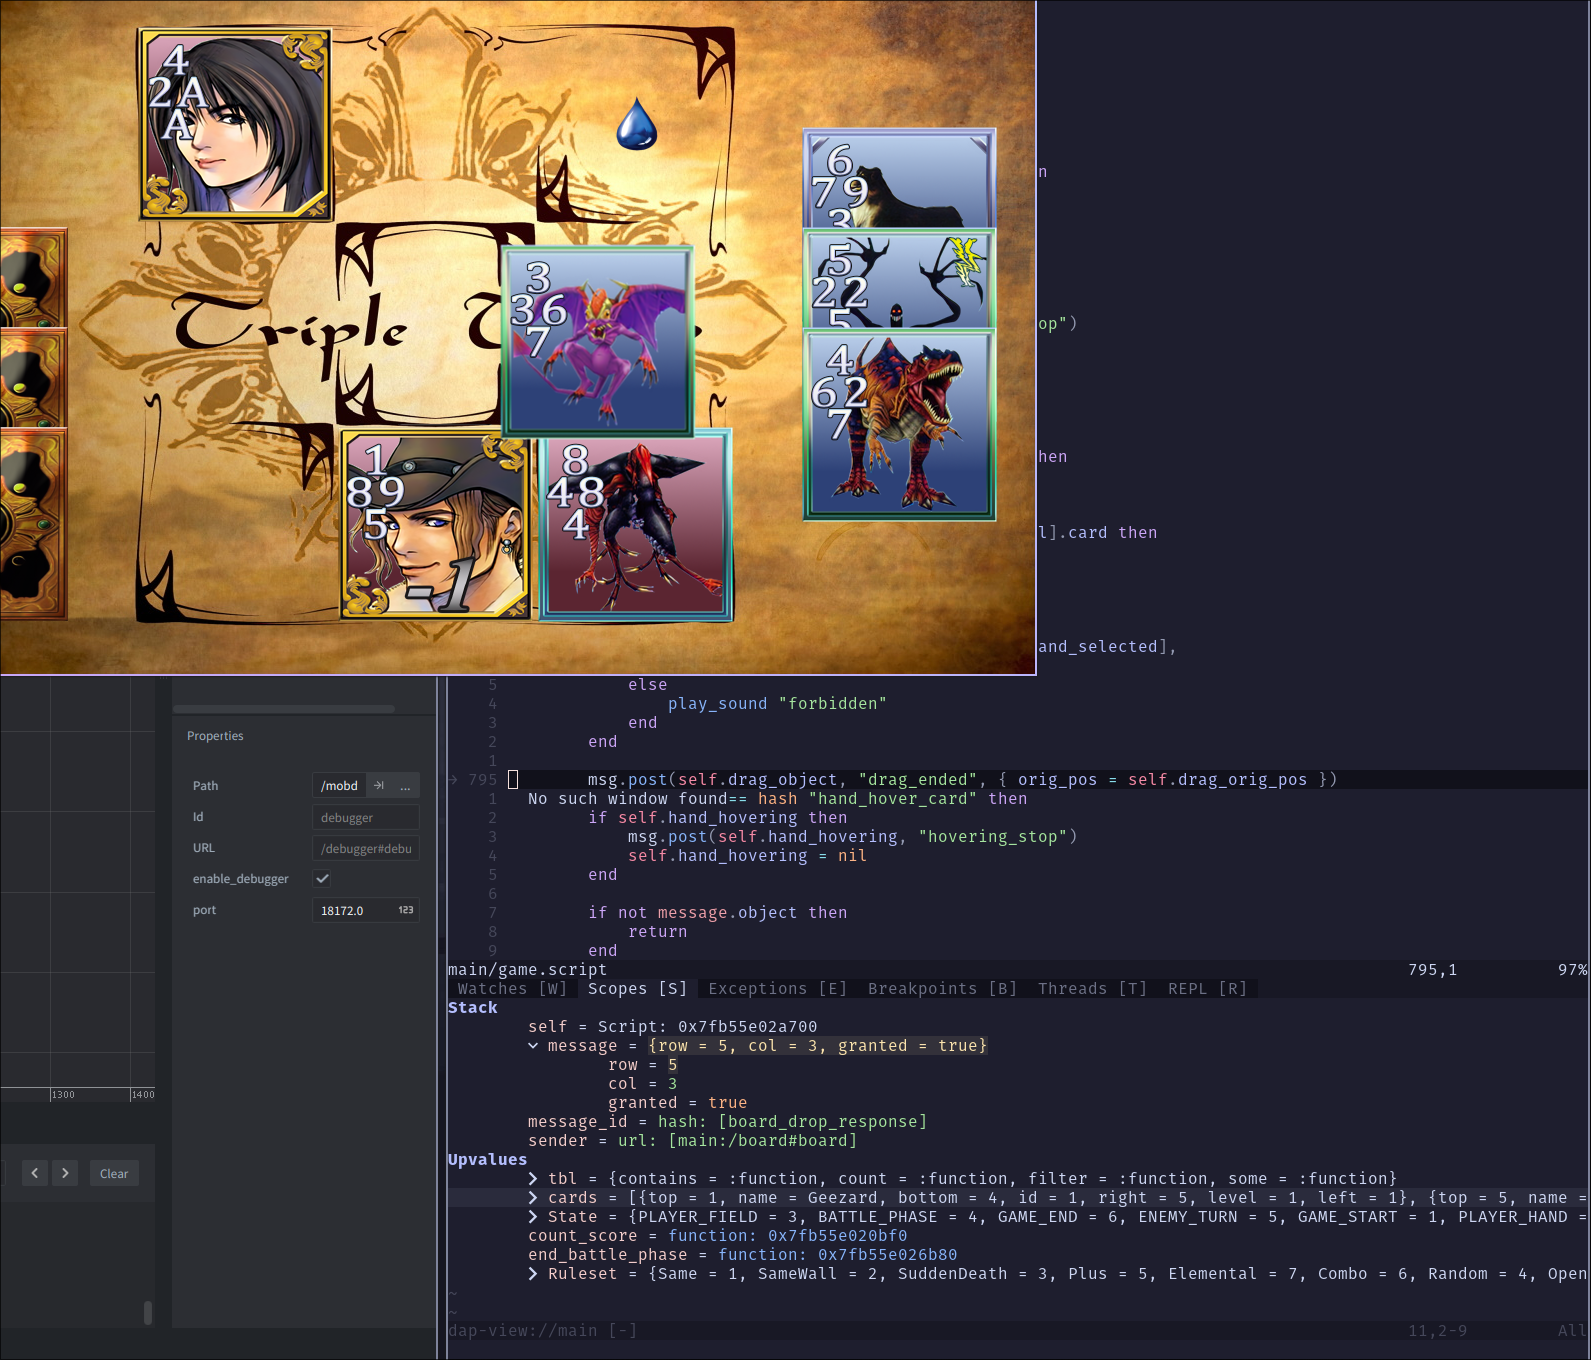
Open Defold, open Neovim, go to the place you want to stop at and hit F9 (set breakpoint) and start the project using F1 (continue). If everything is set up correctly your project should now start and if you hit the place with the breakpoint it should stop and Neovim should show you some informations like this:
And with that we have a lightweight (less than 50 lines of Neovim config) Defold IDE, I hope you enjoyed reading it! This is obviously only the start, while we’ve covered the essentials for a functional workflow, the beauty of Neovim is its extensibility. You can now tweak this foundation to fit your specific needs, integrate it into an existing one or maybe try out one of the popular distributions (and turn them into your custom Defold IDEs). The sky is the limit!
Some recommendations for plugins to check out:
- fzf-lua, adds a fuzzy finder search for searching files, LSP items, etc.
- oil.nvim, a way better way of handling your file tree
- auto-session, instead of re-opening the files you were editing before every time you open Neovim, just have the old session restored
- hop.nvim, jump around your text buffer easier
Thanks for reading!